Pages - Menu

Monday, December 17, 2012

Memo Pad Look Up and Maintenance in Finacle , Part - I

Memo  pad  is  an  entry  whereby we  can  store  an  information  of  the  account
holder or a message which we want to be popped up at the time of operation in
the account.

There are two types of memo pads in Finacle –

System generated
User created

A.  SYSTEM GENERATED MEMO PAD

Where system on its own creates a memo pad entry. For example –

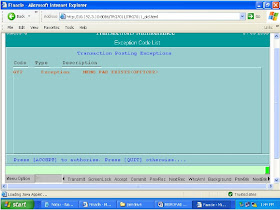
When any modification is done in CUMM, but not verified, then until the verification of CUMM is done, system shall raise an exception ‘Memo Pad Exist’ whenever account of the customer is accessed in TM or any other menu option. Once the modification in CUMM is verified / cancelled, system shall automatically remove memo pad entry.

Same is the case, when any modification is done in account using menu option ACM, but not verified.   Say there is a change in the Mode of Operation in the account but the same is pending for verification, so long the verification in the account is not done the system will continue to show the  Memo  Pad  in  order  to  remind  that  some  thing  is  pending  in  the account.  Basically, Memo Pad is a message or like a caution which used
to write in red ink on the top of the ledger page that whenever there is an operation in the account or otherwise also the system should show us that message or caution.

To make the user aware / caution about such modifications done but not verified  or  storing  a  message  which  we  want  should  be  shown  system creates a memo pad entry.

NOTE : Please  note  that  the  system  created  memo  pad  can  not  be  deleted. System shall automatically remove memo pad entry once the modifications done is either verified or cancelled.


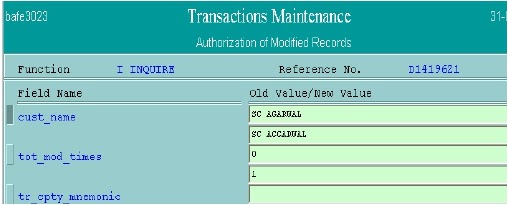
See in the following screen the spelling of name in the customer master has  been  changed.Now  during  operation  in  the  account,  the  system shows Memo pad Exists.  That means we should inquire as to what is this before posting of the transaction.


B.  USER CREATED MEMO PAD

If a user wants to provide additional information about a particular customer / account, like documentation incomplete or any such information / irregularity, he can create a memo pad entry in the system on the account. System shall raise an exception ‘Memo Pad Exist’, whenever the account is accessed at any of the CBS branches. Please refer to ‘Adding a Memo Pad Entry’ topic for further details.


C.  MEMO PAD LOOKUP

As discussed earlier, if the system raises an exception ‘Memo Pad Exist’ and
if  the  user  wants  to  see  the  details  of  memo  pad  entry,  he  shall  follow
following steps -

1.  The system shall display exception as shown in following screen


2.  User  shall  press  Control+F9  to  see  memo  pad  details.  System  shall display Memo Pad details. 


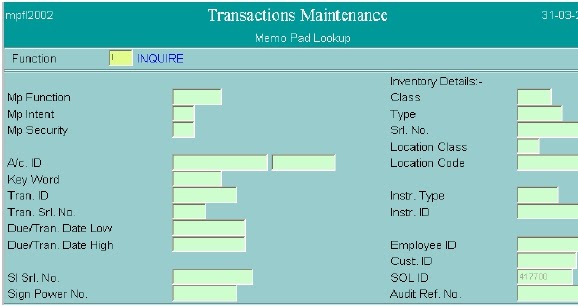
3.  Function – I (inquire). Press F4.

4.  A/c No. – Enter the A/c No. of which user wishes to inquire memo pad
entry.  Press  F4.  System  shall  display  list  of  memo  pads  like  the  one
shown in following screen.


5.  User can press Control+E (Explode) on the memo pad entry to further
see  the  details.  System  shall  display  details  of  memo  pad  like  the  one
shown in following screen.
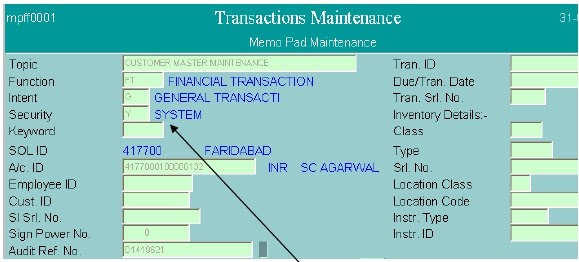
6.  From the topic and memo pad text, user can analyze the reason of memo
pad. If the value against the field Security is Y (System), then that means
it is a system generated memo pad.
7.  If the user wants to know what modifications are done in the customer /
account  details,  he  can  press  Control+E  (Explode)  on  Audit  Ref.  No.
field.   System   shall   display   table   and   key   values.   User   can   press
Control+E   (Explode)   on   the   record   to   further   see   the   details   of
modifications. System shall display the details of modifications like the one
shown in following screens.


8.  After  analyzing  the  details  of  memo  pad,  user  can  press  F3’ s  until  the
system comes back to the exception list. 
9.  If the user wants to accept the exception, he can do so by pressing
F4; else, he can press F3 to quit.


Inquiry and Reports menu in Finacle related to Demand Draft


Here are few Reports Menu used for inquiry related to Demand Draft issued and DD Paid details for your reference.

SPECIFIC DD ISSUED INQUIRY – MENU OPTION ‘DDII

Using this menu option, user can inquire on the particulars of any specific DD
that has been issued.

1. Type ‘DDII’ at the finacle user menu option block and press <enter>
2. Enter DD number and date of issue and press F4.
3. System displays the particulars of the DD.
4. Press F3 to <quit>.

DD CREDITS INQUIRY – MENU OPTION ‘DDIC

Using  this  menu  option,  user  can  inquire  on  credits  that  have  gone  into  the
centralized  DD  a/c.In  this  inquiry,  system  displays  the  date  of  issue,  DD number, issuing/drawee branch code, DD amount and name of payee.  User has
to enter selection criteria.

1. Type ‘DDIC’ at the finacle user menu option block and press <enter>
2. Enter selection criteria like DD no from/to, Issue date from/to, DD amt low/high, drawee bank/branch code, purchaser a/c number, inventory
type and number, print option, print flag, print count and press F4.
3. System displays all records meeting the selection criteria.
4. To  see  further  details  of  any  specific  record,  go  to  that  record  and
<explode>. System would display further details of that record.
5. Press F3 to return to previous screen.
6. Press F3 again to <quit>.

SPECIFIC DD PAID INQUIRY – MENU OPTION ‘DDIP

Using this menu option, user can inquire on the particulars of any specific DD
that has been paid.

5. Type ‘DDIP’ at the finacle user menu option block and press <enter>
6. Enter DD number and date of issue and press F4.
7. System displays the particulars of the DD.
8. Press F3 to <quit>.

DD CREDITS INQUIRY – MENU OPTION ‘DDID

Using  this  menu  option,  user  can  inquire  on  debits  that  have  gone  into  the
centralized  DD  a/c. In  this  inquiry,  system  displays  the  date  of  issue,  DD
number, issuing/drawee branch code, DD amount and name of payee.  User has
to enter selection criteria.

DD Status Maintenance - Menu 'DDSM'

Using this menu you can inquire the DD Paid details ( Payee / Drawee Branch , DD Paid Date , Drawee details etc ). even you can re-validate a DD using this menu for draft Payment using function M and get it verified by another user.

Marking a Demand Draft Lost and Issuing Duplicate DD in finacle


We are discussing on Demand Drafts and Payorder modules of finacle last week , here we represent you few other menu options related to Marking a Demand Draft Lost & then issuance of Duplicate DD.

MARK A DEMAND DRAFT AS LOST 

MENU OPTION : DDLOST

Status of a demand draft, which has been printed, can be marked as ‘Lost’ only
by the DD issuing branch. This is a pre-requisite for issuing a duplicate DD.

1.  Type ‘DDLOST’ at finacle user menu option block and press <enter>.
2.  Enter DD number, its date of issue and DD issue tran id (in case multiple records with  same DD number and date of issue exist) and press F4.
3.  System   displays   the   particulars   of   the   demand   draft   and   asks   for confirmation “Non Payment Advice Required”. If the value for this field is Y’,  then  user  has  to  enter  receipt  of  non-payment  advice  using  menu option ‘DDNPADV’ before issue of duplicate DD. If the value for this field is ‘N’, then ‘DDNPADV’ is not required.
4.  Press F10 to commit. System updates the status of DD as ‘Reported Lost


ISSUE OF DUPLICATE DEMAND DRAFT 

MENU OPTION : DDD

A duplicate demand draft can be issued only after the status of original demand
draft  has  been  marked  as  ‘Lost’  and  non-payment  advice  from  the  drawee
branch has been entered in ‘DDNPADV’.

1.  Type ‘DDD’ at finacle user menu option block and press <enter>.
2.  Enter original DD number, date of issue, tran id (in case multiple record
exists) and put “create service charge” flag to ‘Y’. Specify tran type as ‘C
for cash or ‘T’ for transfer. Press F4.
3.  System  displays  the  particulars  of  the  demand  draft.  Press  F4  again.
System displays duplicate DD issue charges. Enter transaction remarks in
the  “Remarks”  column  and  press  F10.  System  displays  the  message
Duplicate DD has been issued successfully. Tran id is ____. Customer
has to pay Rs._____”. Note down the tran id
4.  Post the transaction through ‘TM’ menu.
5.  Print the demand draft using menu option ‘DDREPRNT’.


Saturday, December 15, 2012

Important Function Keys in finacle

Earlier we have discussed basic function keys used in finacle , presenting these again for your reference 


Physical Key
What does it do?
F1
Field level help. Like in several word processors and spreadsheet
packages, F1 displays context sensitive help messages and field
level help messages.
F2
List. This key lists the codes that may be used in a particular field.
F3
Quit/ Back. Quits and takes the user back to where he started when
in action. It can be used when the input is incorrect and the user
wants to abandon what he has been doing. It can also be used to go
back to the previous menu.
F4
Accept. After the user has completed the input, this key can be used
to accept the data.
F5
Background Menu
F6
Next Block
F8
Copy Record
F9
Display Signature
F10
Commit/ Save. This is very important key and this concludes the
transactions. This is the commit and transactions get into the General
Ledger (database) when this key is used.
F11
Next field
F12
Previous Block
TAB
Go to next valid field
ENTER
Go to the next field
CTRL+
Next record
CTRL+
Previous record
CTRL+
Scroll left
CTRL+
Scroll right
CTRL+F1
Help maintenance
CTRL+F3
Show key map
CTRL+F4
Display error
CTRL+F8
Terminal lock
CTRL+F9
Memo pad look up
CTRL+F11
Context level help
CTRL+D
Page down on a list
CTRL+E
Explode. This key is particularly useful for the further inquiry .
CTRL+F
Clear field. This key combination can be used when the user wants to
clear the field.
CTRL+J
Display cookie field
CTRL+K
Clear a set of field
CTRL+T
Display LGI. The user ID, Terminal ID, SOL, BOD Date and language
details are displayed.
CTRL+U
Page up on a list
CTRL+X
Put BOD date. This key combination populates the default BOD date
in the field.
SHIFT+F1
Function key help
SHIFT+F4
Select the current item from the list. This key combination can be
used to select a value from the list of valid values listed for a
particular field.
SHIFT+F11
Transmit
SHIFT+TAB
Go to the previous field


Feel free to drop your feedback and suggestion and comments on the post