

Dear Readers, We have already discussed the Shortcut way of Loan account opening in Finacle by following GIVSHE56 Rule, this time we will discuss the detailed procedure of account opening of Loan accounts in Finacle.
Menu option : OAAC
Go to Menu option and enter option OAAC. The following screen will appear:

Enter Customer ID & Press F11 for validating Customer’s Name
Enter appropriate Scheme Code & GL Sub-head Code Press F4. in some Banks the GL subhead Code will be automiatically selected when you select Scheme Code and Press F4, Then following screen will appear

For every account opening of Loans in finacle, the General, Scheme, Limit Details, Interest, MIS and Repayment Schedule Details are mandatory as discussed in our previous post i.e GIVSHE56 Rule.
The above 1st Screen of General Details will appear then enter the details like mode of operation, location code, Collect Charges(Y/N) etc. Then Press F6 for next screen

The above 2nd Screen of General Details will appear then enter the details like Passbook/ Statement ( Enter S for Pass sheet) , statement frequency, interest credit a/c flag etc. The most important field in this screen is Interest Rate Code. Please choose appropriate code( defined by your Bank) for the loan account and the scheme in which you want to open the loan account.
Press F6 for next screen.

In the above 3rd screen important fields are as follows: -
Interest Calculation Freq Dr : Please select the appropriate value.
Interest Calculation Freq Dr : Please select the appropriate value.
Next Int. Calc. Date Dr: Please select the appropriate value.
Then Press F6 and will come on 1st screen. Now Press F4 for accepting General Details.
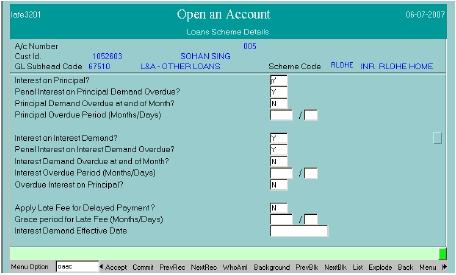
In Option field enter ‘S’ for entering Scheme Details and Press F4. Then following screen
will appear:
In Option field enter ‘S’ for entering Scheme Details and Press F4. Then following screen
will appear:

In the above screen of Scheme Details fill the following fields as:
Enter Loan Amount: Sanctioned Amount
Loan Period: Enter total months in 1st Field
Enter Credit File No.
Holder In Operative A/C For Amount Due: ‘Y’ – Yes or ‘N’ – No
Repayment Method: If above field value is ‘Y’, so Put here ‘E’, else put ‘N’
Operative A/c No. above value is ‘Y’, so put appropriate SB, CA Account No.
Debt Acknowledgement Date: Enter the date of loan documents / revival letter, whichever
is later.
All other mandatory fields needs to be filled. Then Press F6 for next screen Put appropriate information as per sanction letter and Press F4 for accepting Scheme
Details.
Enter Loan Amount: Sanctioned Amount
Loan Period: Enter total months in 1st Field
Enter Credit File No.
Holder In Operative A/C For Amount Due: ‘Y’ – Yes or ‘N’ – No
Repayment Method: If above field value is ‘Y’, so Put here ‘E’, else put ‘N’
Operative A/c No. above value is ‘Y’, so put appropriate SB, CA Account No.
Debt Acknowledgement Date: Enter the date of loan documents / revival letter, whichever
is later.
All other mandatory fields needs to be filled. Then Press F6 for next screen Put appropriate information as per sanction letter and Press F4 for accepting Scheme
Details.
In Option field enter ‘H’ for entering Sanction and DP (Drawing Power) Details and Press F4. Then following screen will appear:

In the above screen of Sanction Details , enter the following fields as:
Sanction / Expiry / Document / Review Date Sanction Level / Authority / Ref. No. and Security Description. Then Press F4. Following Drawing Power Details screen will appear:

In the above screen of Drawing Power Details enter the following fields as:
Drawing Power Indicator: Enter ‘D’ Derived from Security in Case of CC Account else E(Equal to Sanction LImit) for other Term Loans
A/C Recalled: ‘N’ and then Press F4 for accepting DP details.
In Option field enter ‘I’ for entering Interest Details and Press F4. Then following screen will appear:
In Option field enter ‘V’ for entering MIS Details and Press F4. Then following screen will appear:

In above screen of MIS select appropriate codes as defined by your Bank. After completion of the same Press F4 for accepting MIS Details.
In Option field enter ‘E’ for entering Repayment Schedule Details and Press F4. Then
following screen will appear:

The user can set up a repayment schedule for the loan sanctioned using this sub option.
1. Flow ID field can have value which is EIDEM for Equated installment demand, PRDEM for Principal demand or INDEM for Interest demand type.
If the account is opened under equated installment scheme then the system default populates the flow id based on the set up done at scheme level. If it is equated instalment, system populates the EI amount based on the number of instalments indicated and the user can over ride it. An exception is also associated with this for doing necessary validations
2. Start date of the installment should always be greater than the account
open date
3. User has to enter the number of installments to arrive at the installment amount
4. Depending upon the parameter set at product level, user can enter the values for the field “number of installments”, and “amount”.
5. Interest demand date should be the next month end date when the next
interest application will take place in the account.
If the user is coming in modify mode, then the original repayment schedule can
be modified. The system does a validations if the number of installments
Press F4 for accepting Repayment Schedule Details.
Then lastly enter option 5 to enter Loan document detail and Charges related to Processing of the Loan. Press F4 enter DSA / Loan Reference details as defined by your Bank and enter the Employee/ Loan Reference ID , Then Press F4
Now Press F10 for commit.
Then Account No. will be generated by system.
Verification of Account Opening of Loan
Menu Option : OAACAU
- Enter Generated A/c No. in Temporary A/c No. Field and Press F4 . For visiting all screens of General Details Press F11 continuously.
- After coming on 1st Screen Press F4 for accepting General Details Enter option ‘S’ for verifying Scheme Details and press F4 , Press F11 for visiting next screen of Scheme Details Verify details and Press F4.
- Enter option ‘H’ and press F4 for verifying Sanction and DP Details First, Sanction Details will appear. Verify and accept with Pressing F4. Then, DP Details will appear. Verify and accept with Pressing F4.
- Enter option ‘I’ and press F4 for verifying Interest Details After appearing Interest Details verify and Press F4 for accepting the same.
- Enter option ‘V’ and press F4 for verifying MIS Details After appearing MIS Details verify and Press F4 for accepting the same.
- Enter option ‘E’ and press F4 for verifying Repayment Schedule Details After appearing Repayment Schedule Details verify and Press F4 for accepting the same.
Press F10 to commit. The account number will be displayed. and the Loan Account will be Verified.


